
")
There’s this moment that happens in my kitchen almost every week usually around Wednesday when I’m tired of cooking and everything in the fridge suddenly feels boring. I open a jar of these pickled radishes, add a few slices to whatever I’m eating, and suddenly I remember why I love cooking in the first place. It’s not dramatic. It’s not complicated. It’s just this small thing that makes everything else taste intentional.
I started making these a few years ago when I was stuck in a rut with my cooking. I was making all these elaborate meals beautiful things, really but they all felt a bit heavy. Like I was trying too hard to impress someone, including myself. Then one evening I grabbed some radishes I wasn’t sure what to do with, threw together a quick brine, and just… let them sit in my fridge. The next morning, I had these gorgeous pink, crunchy things that completely shifted how I thought about flavor. They weren’t the main event. They were the thing that made the main event actually sing.
What I love most about them is how little they ask of me. I’m not someone who has time for elaborate preserving projects or canning equipment. But this? This I can do on a Tuesday night while my coffee brews, and then I’ve got weeks of brightness waiting for me. Every taco tastes better. Every grain bowl feels more thoughtful. Even plain toast becomes something worth eating.
Why You’ll Love This Recipe
The first thing that sold me on making these regularly is the time commitment or rather, the lack of one. From start to finish, you’re looking at maybe 10 to 15 minutes of actual hands-on work. Washing, slicing, mixing a brine, and pouring. That’s it. Everything else happens in your refrigerator while you go about your life. No special equipment, no complicated techniques, no standing around wondering if you’re doing it right.
The second thing that keeps me making batch after batch is how adaptable this recipe actually is. I’m not someone who plans meals perfectly or buys exactly what’s on my list. I work with what I have. Red radishes from the farmers market last week? Use them. A bunch of daikon someone brought me? Perfect. Those unusual watermelon radishes I found on a whim? Absolutely throw them in. The brine works beautifully with all of them, though each variety brings something slightly different to the table different textures, different flavors, different visual appeal. That flexibility means I’m actually making these instead of just thinking about making them.
And then there’s the practical magic of it all. These keep for a solid 2 to 3 weeks in your fridge, which means one batch covers most of my week. I always have a jar going, especially during spring and summer. It’s become one of those ingredients I stop actively thinking about and just automatically reach for whenever I need brightness, crunch, or something to cut through richness. Having them on hand changes how I cook.
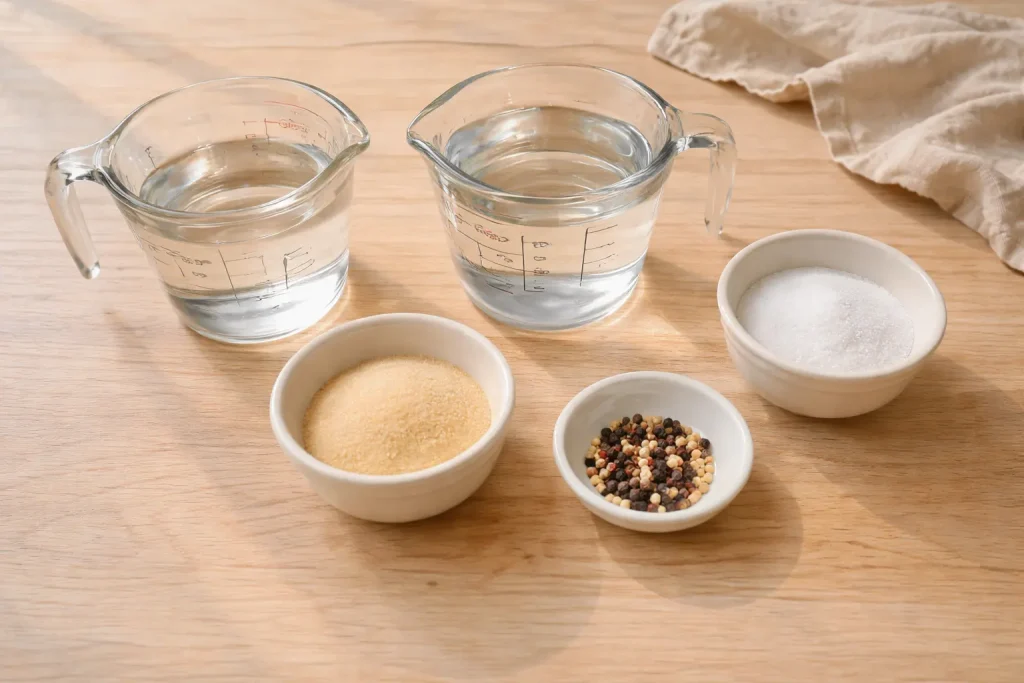
Ingredients for the Perfect Brine
Here’s where the magic actually lives, and honestly, it’s simpler than most people think it should be.
Understanding the Basic Ratio
Every culture that pickles has figured out roughly the same thing: you need the right balance between acid, dilution, sweetness, and salt. Too much vinegar and everything tastes aggressive. Too much sugar and you’ve basically made candy. The ratio that works consistently across nearly every pickling tradition is roughly equal parts vinegar, water, and sugar then salt adjusted to taste.
For a standard batch that fills about four regular mason jars, I use:
- 1 cup vinegar
- 1 cup water
- 1 cup sugar
- 1½ tablespoons salt
That’s your baseline. From here, you can absolutely adjust based on your own preferences. If you like things sharper and more acidic, use a bit more vinegar next time. If you prefer sweeter pickles, add another tablespoon of sugar. But this ratio is reliable, and it works every single time.
Which Vinegar Should You Choose?
This choice matters more than people realize, because different vinegars bring completely different personalities to what you’re making.
White vinegar is straightforward and neutral. It’s sharp, it gets the job done, and it doesn’t compete with your radish flavor or color. If you want the radish itself to shine and you care about keeping those beautiful pink tones bright and true, white vinegar is your answer. It’s also the most affordable option, which doesn’t hurt.
Rice vinegar is gentler and slightly sweet on its own. This is what you’d reach for if you want something that feels more delicate and refined. It’s traditional in Asian pickling methods and pairs beautifully with daikon radishes. The resulting pickles have less aggressive tang and more subtle nuance. They taste more rounded.
Apple cider vinegar brings something warmer to the table a subtle fruitiness that some people absolutely love. The flavor becomes rounder and more complex. The trade-off is that it can shift your color slightly over time, turning things a bit less vibrant pink than you might expect.
For this recipe, I’m typically reaching for white or rice vinegar depending on what I’m making and what I’m serving them with later. Both are reliable. Both work beautifully.
The Flavor Builders: Making Them Yours
This is where you get to make these pickles truly yours. The base brine is just the foundation the real personality comes from everything else you add.
Whole peppercorns are something I include almost every time. They add this gentle warmth that you can’t quite pinpoint but definitely notice once it’s there. Mustard seeds bring a subtle earthiness and depth that makes people go “what is that?” in the best possible way. Garlic cloves, sliced thin, become soft and almost creamy after a few days in the brine, adding savory, mellow notes. If you like heat, dried chili peppers or fresh chili slices add kick gradually as the days go on, so the spice builds over time. A single bay leaf grounds everything with something herbal and sophisticated.
I usually start with peppercorns and mustard seeds as my anchor aromatics, then pick one or two other things depending on what I’m planning to serve them with and what flavors I’m craving. Coriander seeds bring a faint citrus note. Dill adds something fresh and bright. Fresh ginger brings warmth. Nothing is required except those first two, honestly, but once you start experimenting, you’ll figure out what you like.
Choosing Your Radish: Red vs. Daikon
Not every radish is the same, and that’s actually exciting because it means you get different results and experiences depending on what you work with.
Red Radishes: The Quick Option
These are the small, round radishes you see at basically every farmers market and grocery store. Fresh, they’ve got that peppery bite that some people love and others find too sharp. But when they pickle, that sharpness mellows out into something much more approachable and pleasant. What you end up with is tender but still snappy, slightly sweet, definitely tangy, and nothing like what you started with.
I slice these thin really thin. A mandoline makes this completely effortless, turning out perfect paper-thin slices in minutes, but a sharp knife does the job just fine if that’s what you have. The thinner you go, the faster they pickle. Thin slices mean you can actually eat them after just one hour in the fridge. They’re perfect for situations where you want that delicate texture on top of toast, tucked into sandwiches, the crowning touch on a taco.
And the color transformation is almost worth it by itself. They turn this gorgeous bubblegum pink that makes everything look more visually appealing just by sitting on top of it. People always ask what they are.
Daikon: The Crunchy Workhorse
Daikon is fundamentally different from red radishes in almost every way. It’s larger, crunchier, and much more sturdy. The flavor is milder to begin with, which means it’s almost like a blank canvas for the brine it soaks up the flavors without losing its own character or becoming mushy.
With daikon, I cut thicker pieces. Half-moons, batons, small cubes whatever feels right for how I’m planning to use them. These thicker cuts take longer to pickle than thin red radish slices (overnight is ideal, sometimes 24 hours), but the payoff is pickles that stay snappy and crunchy even after weeks sitting in the fridge. The texture holds up beautifully over time.
If you’re interested in making Korean-style yellow daikon what’s called danmuji daikon is really your only choice. Those golden pickles are traditionally made with turmeric mixed into the brine, and the earthiness of the spice plus the mild flavor of daikon is honestly unbeatable. They look incredible and taste completely different from pink radish pickles.
Other Varieties Worth Trying
Watermelon radishes and Easter Egg radishes are harder to find at regular stores, but if you spot them at a farmers market, grab them. They pickle beautifully, stay crisp, and when you slice into them, you get these stunning visual surprises hidden inside. They’re fun when you want to impress someone or just want something visually interesting in your fridge. Black radishes are another option earthier, with a different kind of crunch.
Step-by-Step Instructions
Okay, here’s where it all comes together, and I promise this is the easiest part of the entire process.
Step 1: Getting the Radishes Ready
Start with radishes that are actually fresh and firm to the touch. Wash them under running water and rub them gently to get all the dirt off. Trim away the greens and roots. And here’s a tip: seriously don’t throw those radish greens away. You can sauté them in olive oil with garlic, throw them into a salad, or blend them into a vibrant green sauce. They’re too good to waste.
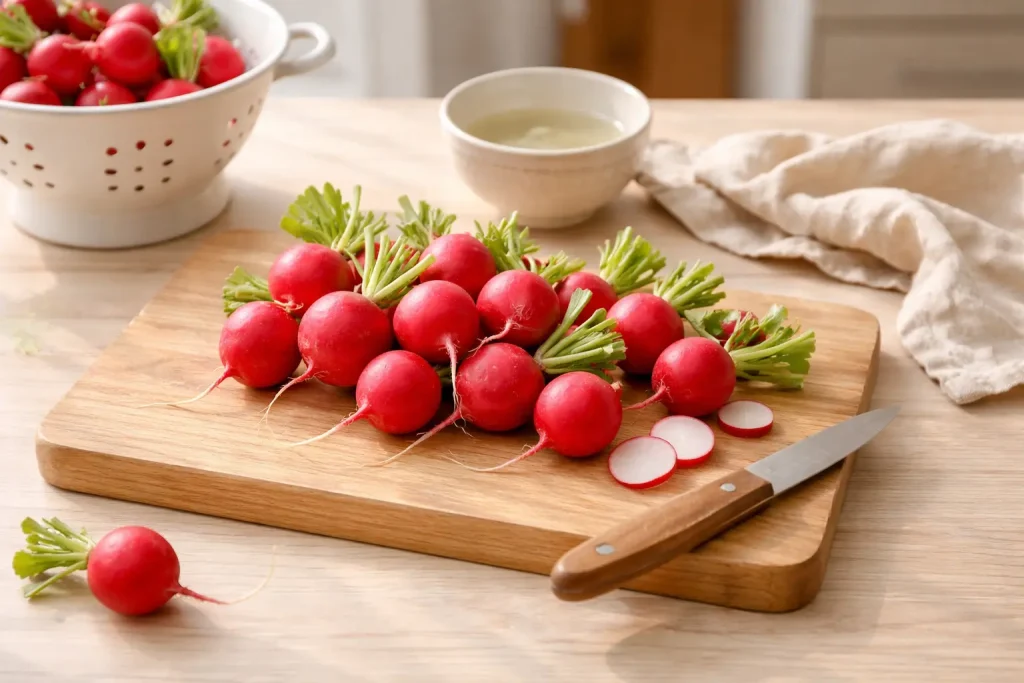
Now you slice. If you have a mandoline, this is your moment to shine it’ll make everything consistent and paper-thin in literally a few minutes. No mandoline? A sharp chef’s knife works perfectly fine. You’re aiming for visibility through the slices if you want maximum pickling speed, or about a quarter-inch thick if you prefer them more substantial.
For daikon, you’re thinking bigger cuts roughly three-quarters of an inch cubed or cut into half-moons depending on how you want to serve them.
Step 2: Making the Brine
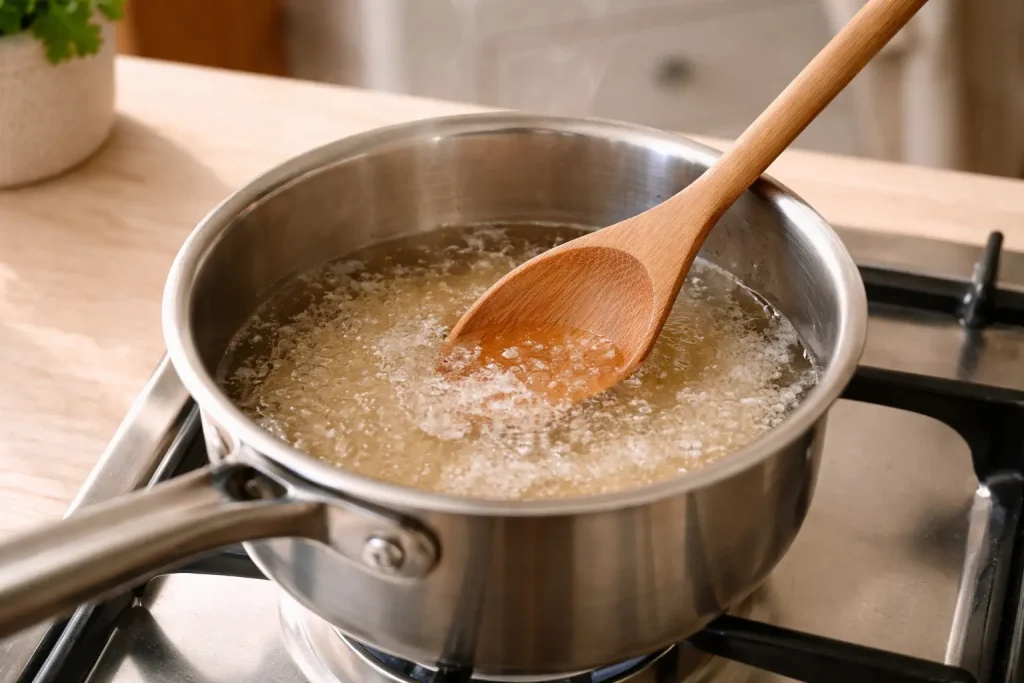
Measure out your vinegar, water, sugar, and salt into a small saucepan. Put it over medium heat and stir it occasionally. You’re not trying to create a rolling boil here. You just want things warm enough that the sugar and salt completely dissolve. Two minutes, maybe three, and you’re done. Then take it off heat and let it come to room temperature before doing anything else. This step matters you don’t want to pour hot brine over your raw radishes because that will partially cook them, and cooking is the enemy of the crunch you’re after. Let it sit on your counter while you prep the jars.
Step 3: Packing and Pouring
Get your clean glass jars ready. Mason jars work beautifully, but honestly any glass jar with a lid will do. Divide your sliced radishes between them. Add your peppercorns, mustard seeds, and any other aromatics you’re using. Distribute them so every jar gets some flavor throughout.
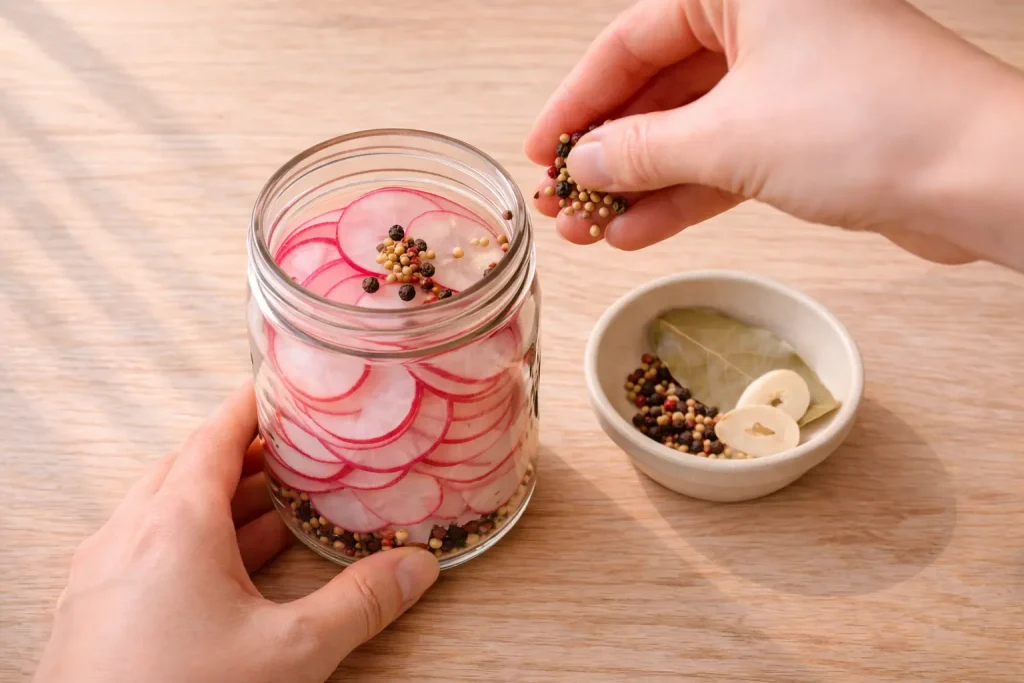
Once your brine is actually cool to the touch, pour it over the radishes. Make sure everything is submerged under liquid this matters for both flavor and safety. If anything’s floating up above the brine, add a splash more water to cover it. Cover the jars with their lids.
Step 4: Refrigerate and Wait
Put these in the fridge. Now here’s the timeline, and it matters: thin-sliced red radishes are genuinely ready to eat in one hour. They’re crunchy, they’re pink, they’re fantastic. Thicker slices or daikon pieces? Give them overnight, maybe 24 hours. They’ll taste noticeably better, and the color will be more developed and complex.
After three or four days, the flavors really settle in and deepen. By this point, they’re almost more interesting than they were on day one. The spices have had time to infuse, the radishes have absorbed the brine more fully, and everything tastes more intentional.
Expert Tips for Maximum Crunch
I’ve made enough batches to have figured out what actually matters and what’s just extra steps that don’t change the outcome.
Never Heat the Radishes Themselves
This is the big one. The brine heats up just to dissolve the sugar and salt that’s it. The radishes stay raw and cold the entire time. Heat makes them soften and lose that satisfying snap. Softening is the enemy here. You want them snappy and crisp, which only happens when they stay raw and cold. Cold brine, raw radishes, that’s your formula.
The Optional Salt Step for Extra Crunch
If you really want to guarantee maximum crunch, here’s something I do sometimes: sprinkle salt directly on your sliced radishes and let them sit for about 15 minutes. This draws water out of the radish cells and actually firms up the structure at a cellular level. Rinse them gently under cold water after, pat them dry, and then pickle them normally. It’s an extra step, but if you’re texture-obsessed like I am, it’s worth it.
Invest in a Mandoline If You’re Serious
If you find yourself making these regularly, a mandoline changes everything. Even slices mean even pickling. No more waiting for thick pieces while thin ones are already perfect. It’s honestly transformative, and they’re not expensive. It’s one of those small kitchen investments that actually pays for itself.
5 Ways to Serve Pickled Radishes
These aren’t just a condiment you add because you have them they’re actually a flavor game-changer across so many dishes.
On Tacos
This might be the most obvious pairing, but it’s obvious because it works so incredibly well. The brightness and acidity cut through richness like nothing else. Carnitas, steak tacos, al pastor, even vegetarian black bean tacos drop some of these on top and watch the whole thing come alive. The crunch, the tang, the visual pop of color, the way it makes everything else taste better. If you’re only going to try pickled radishes one way, try them on a taco first.
With Fried Chicken
In Korea, this is basically a requirement. Fried chicken and pickled radish is called Chicken Mu, and the combination exists for a reason the cool, sharp tang is the perfect counterbalance to crispy, savory, salty chicken. They need each other. If you’re making fried chicken at home, make a batch of these at the same time. You’ll understand immediately why this pairing is traditional.
On Avocado Toast
I know avocado toast feels overdone, but hear me out. A few slices of these change everything about the experience. You’ve got creamy, rich avocado, a good bread base with some texture, maybe some sea salt, and then these bright, crunchy radishes bringing everything into focus. It’s actually a genuinely great combination. It’s my go-to breakfast when I want something simple but intentional.
In Vietnamese Sandwiches
Bánh mì relies on pickled vegetables that’s non-negotiable to the whole thing. These radishes fit right into that tradition beautifully. They add exactly what those sandwiches need: crunch, brightness, a little tang. They’re traditional for a reason.
In Grain Bowls
Buddha bowls, rice bowls, quinoa situations, whatever warm grain base you’re doing these add color, texture, and actual flavor. They’re especially nice with warm grains because that temperature contrast is really satisfying. The heat of the grain, the cool crunch of the pickle, the way they balance each other. They elevate a simple bowl into something actually memorable.
Pickled Radish Recipe
Ingredients
Equipment
Method
- Prepare the radishes: Rinse thoroughly and trim tops and roots. Slice thin (using a mandoline if available) for red radishes, or cut daikon into half-moons or batons approximately ¼-inch thick.
- Make the brine: Combine vinegar, water, sugar, and salt in a saucepan over medium heat. Stir until sugar and salt completely dissolve, about 2-3 minutes. Remove from heat and allow to cool to room temperature.
- Pack your jars: Distribute radish slices among clean glass jars. Add peppercorns, mustard seeds, and any optional aromatics.
- Pour the brine: Once cooled to room temperature, pour brine over radishes until fully submerged. Seal jars with lids.
- Refrigerate and serve: Thin-sliced red radishes are ready in 1 hour. Daikon and thicker slices benefit from 24 hours. Flavors continue developing for 3-4 days. Keeps refrigerated for 2-3 weeks.
Nutrition
Notes
Tried this recipe?
Let us know how it was!FAQ
Q1. Do I need to boil the brine?
You warm it just enough to dissolve the sugar and salt, then let it cool completely. You’re not boiling anything. Hot brine will partially cook your radishes, and that softens them and ruins the texture. Cold or room-temperature brine keeps them snappy and crisp.
Q2. Can I reuse the brine for a second batch?
Absolutely. Just strain out the old radishes, add new ones, and refrigerate. The flavor will be less intense the second time around since the radishes already absorbed some of it, but it works fine.
Q3. What’s the difference between quick pickled and fermented?
Quick pickled uses vinegar for tang and preservation these are ready in hours. Fermented radishes use salt and time, developing probiotics and a different kind of complexity. Totally different methods, totally different results and flavor profiles. This recipe is quick pickle territory, so we’re talking vinegar-based and refrigerated.
Q4. Can I add other flavors?
Completely. Once you understand the basic ratio, the possibilities open up. Dill, ginger, cardamom, cinnamon experiment. Some combinations will become your favorites. The recipe is a starting point, not a rulebook.