
")
Have you ever picked up a loaf of Ezekiel bread at the store and almost dropped it when you saw the price? At $8 to $10 a loaf and always kept in the freezer section it can feel like a luxury item just to eat healthy bread.
Here’s the good news: you can make it right at home. And the homemade version? It tastes even better.
I have tested this recipe many times to get it just right. Ezekiel bread is not like your normal sandwich bread. It takes a few days because the grains need time to sprout first. But most of that time is just waiting the actual work is maybe 45 minutes spread across those days. And when you pull that warm, golden loaf out of the oven? Every single minute is worth it.
This recipe covers everything how to sprout the grains the traditional way, how to mill them into flour, and how to bake a beautiful loaf. Plus, if you don’t have a grain mill or a dehydrator, I have an easy shortcut method for you too. Nobody gets left out here!
Let’s do this.
What Is Ezekiel Bread?
Ezekiel bread is not just another “healthy bread.” It is a special type of bread made from six whole grains and beans mixed together. It has been around for thousands of years and the story behind it is pretty amazing.
The Biblical History (Ezekiel 4:9)
The recipe actually comes from the Bible. In the book of Ezekiel, chapter 4, verse 9, a prophet named Ezekiel is told to take wheat, barley, beans, lentils, millet, and spelt mix them together in one pot and make bread from them.
That is over 2,600 years ago. And that same simple list of six ingredients is exactly what we still use today. The brand Food For Life based their entire Ezekiel 4:9 Sprouted Grain Bread on that exact Bible verse. But you don’t need a big factory to follow it. You just need a little patience and some whole grains from your local health food store.
Why Sprout the Grains?
This is the part that makes Ezekiel bread truly special.
All whole grains have something inside them called phytic acid. Think of phytic acid like a tiny lock. It grabs onto good minerals in the grain like iron and zinc and stops your body from being able to use them. So even if the grain is healthy, your body can’t get the full benefit.
When you sprout grains, you break that lock open.
Here is what happens when a grain sprouts:
- The phytic acid breaks down, so your body can now absorb those minerals
- The grain becomes easier to digest
- Without sprouting, up to 90% of the helpful plant compounds in these grains would not be absorbed by your body at all
- Vitamins go up especially vitamin C and B vitamins
- The bread has a lower effect on your blood sugar
It is like the grain was sleeping. Sprouting wakes it up and unlocks all the good stuff inside.
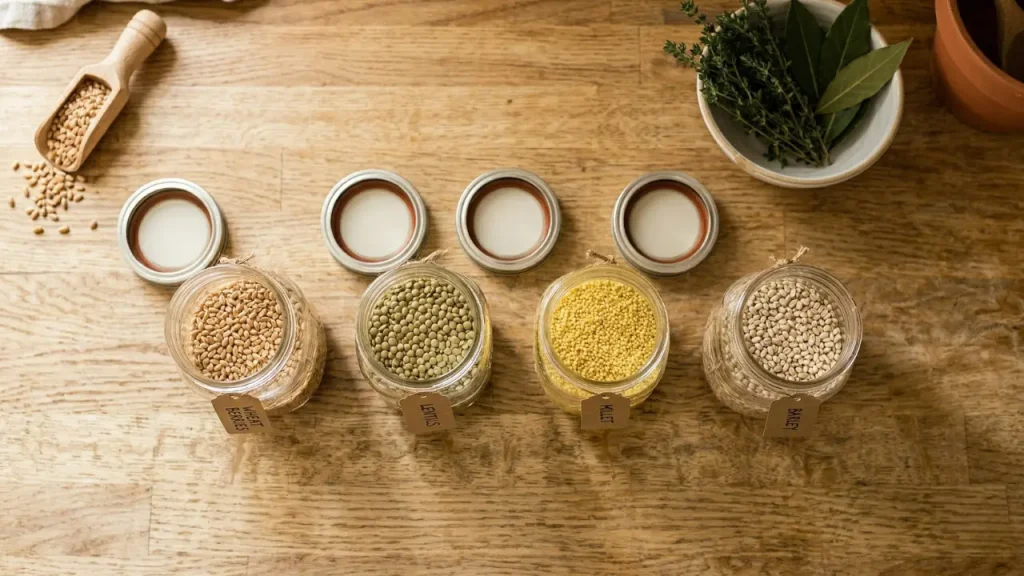
The 6 Essential Ezekiel Bread Ingredients
One of the most common questions people ask is: “What is actually in Ezekiel bread?”
The answer is simple six real foods. That’s it. No weird additives, no refined flour, no mystery ingredients.
1. Wheat — The base of the bread. It gives the loaf its shape, a nutty flavor, and a good amount of protein and fiber. Use hard red wheat berries (not soft) the harder ones have more protein and make a better loaf.
2. Barley — A very old grain with a rich, earthy taste. It is also high in a special fiber called beta-glucan, which helps keep your heart healthy.
3. Millet — A tiny round grain that is naturally gluten-free. It makes the bread a little lighter so it is not too heavy and dense. It also adds a gentle, mild sweetness.
4. Spelt — An ancient cousin of modern wheat. It has a soft, slightly sweet, nutty flavor. Spelt is an ancient wheat variety that gives the finished loaf a distinctly nutty flavor. Many people find spelt a little easier to digest than regular wheat.
5. Lentils — This is where things get exciting! Grains are missing an important building block called lysine. Lentils are full of it. When these six grains and legumes are sprouted and combined, a complete protein is created that contains all 9 essential amino acids. That means one slice of Ezekiel bread gives your body everything it needs to build muscle and repair cells from plants alone!
6. Beans (Great Northern beans or Pinto beans) — They work right alongside the lentils to finish filling in the protein picture. This grain-plus-bean combo is the reason Ezekiel bread is known as one of the best plant-based protein foods you can eat.
You will also need: warm water, active dry yeast, sea salt, and a small spoon of honey and olive oil to help the dough stay moist and rise well.
How to Make Ezekiel Bread: Step-by-Step
Before we start, here is your simple timeline so you know what to expect:
- Night of Day 1: Soak the grains in water (10–12 hours)
- Day 2 and Day 3: Rinse the grains every 8–12 hours and wait for tiny tails to grow
- Day 3 or 4 (traditional method): Dry the sprouted grains completely, then grind them into flour
- Baking day: Mix the dough, let it rise, and bake
Total time you are actually doing something? About 45 minutes total. The rest is just waiting and watching little sprouts grow which is honestly kind of fun.
Phase 1: Sprouting and Dehydrating (The Traditional Way)
What you will need: Mason jars, cheesecloth or a sprouting lid, a dehydrator or your oven on its lowest setting, and a little patience!
Step 1 — Soak your grains.
Here is exactly what you need for one loaf:
- 2½ cups hard red wheat berries
- ½ cup spelt berries
- ¼ cup hulled barley
- ¼ cup millet
- ¼ cup green or brown lentils
- ¼ cup great northern beans or pinto beans
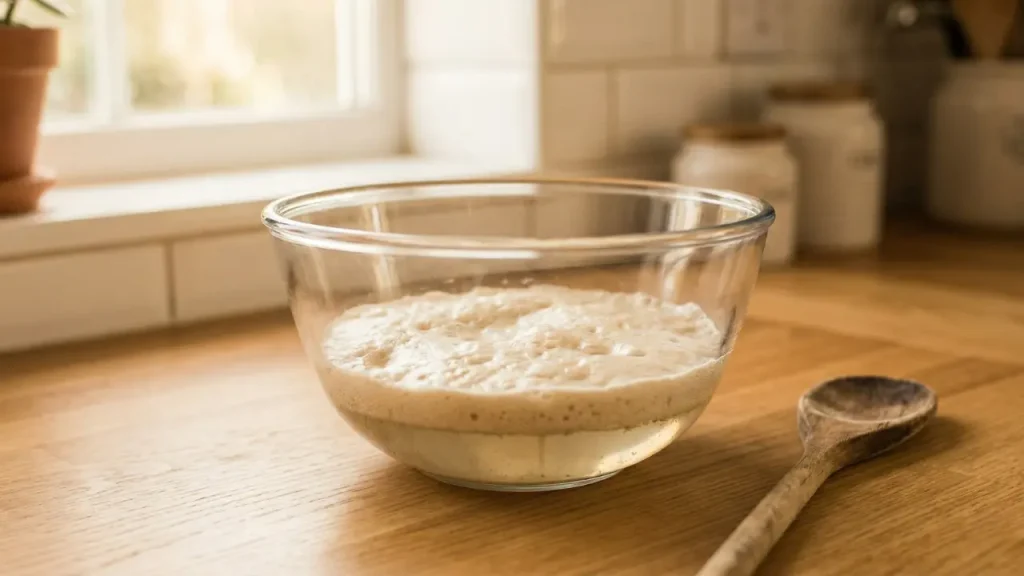
Put all the grains and beans into mason jars or a large bowl. Cover them with cool water at least 3 inches above the grains. They will drink up a lot of water overnight! Soak for 10 to 12 hours at room temperature. Overnight works perfectly.
One helpful tip: lentils and millet sprout faster than the harder grains. Some bakers soak them in a separate jar so everything finishes sprouting at about the same time. This is optional but it helps!
Step 2 — Drain and throw out the soaking water.
This step is important. Pour out ALL the soaking water and do not use it for cooking or anything else. It is full of the phytic acid we are trying to get rid of! Rinse the grains well with fresh cool water, drain them completely, and then tilt your jars upside down at an angle so the leftover water can drip out. Good airflow stops mold from growing.
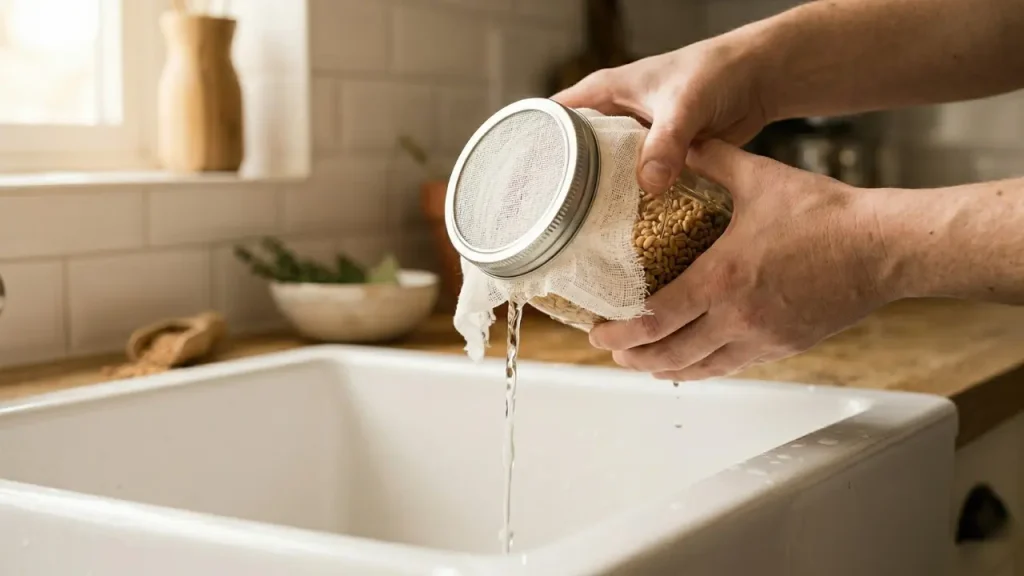
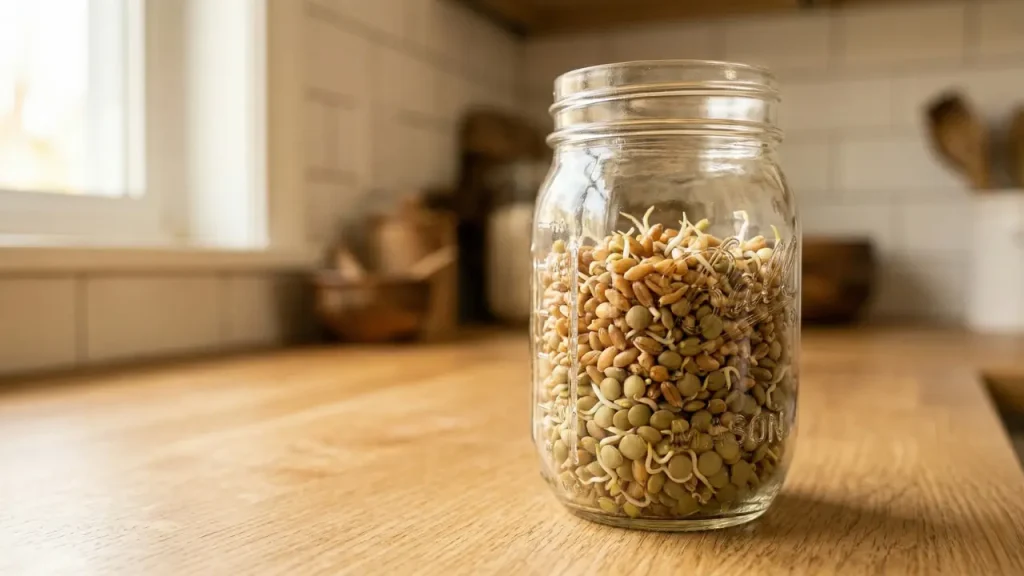
Step 3 — Rinse twice a day and wait for tails.
Every 8 to 12 hours, rinse the grains with cool water and drain them well again. Within 1 to 3 days you will start to see tiny little white tails coming out of the grains. Those are the sprouts! You are looking for very small white tails about ⅛ to ¼ inch long. Short tails are perfect for bread because they blend well and keep the flavor balanced. You do not want long, grassy sprouts.
⚠️ Mold warning: The number one mistake beginners make is leaving water sitting in the jar. Always drain completely and tilt the jars. Properly drained sprouts smell fresh and clean. If anything smells sour or looks slimy, throw it out and start over. It happens no big deal!
Step 4 — Dry the sprouts completely.
Spread the sprouted grains in one flat layer on your dehydrator trays or on a baking sheet lined with parchment paper. Dry them at 115°F to 125°F until they are totally, completely dry. This takes about 12 to 24 hours. If you use your oven, set it to the lowest temperature and prop the door open just a tiny bit with a wooden spoon so the wet air can escape.

This step cannot be skipped or rushed. Even a little bit of moisture will make the flour gummy and your bread will not bake right. When in doubt, let them dry longer.
Phase 2: Milling the Grains Into Flour
Once your sprouted grains are bone dry and cooled down, it is time to turn them into flour!
With a grain mill: This is the best tool for the job. It grinds the dried sprouted grains into a soft, warm, fragrant flour. It even smells like fresh bread before you have baked anything!
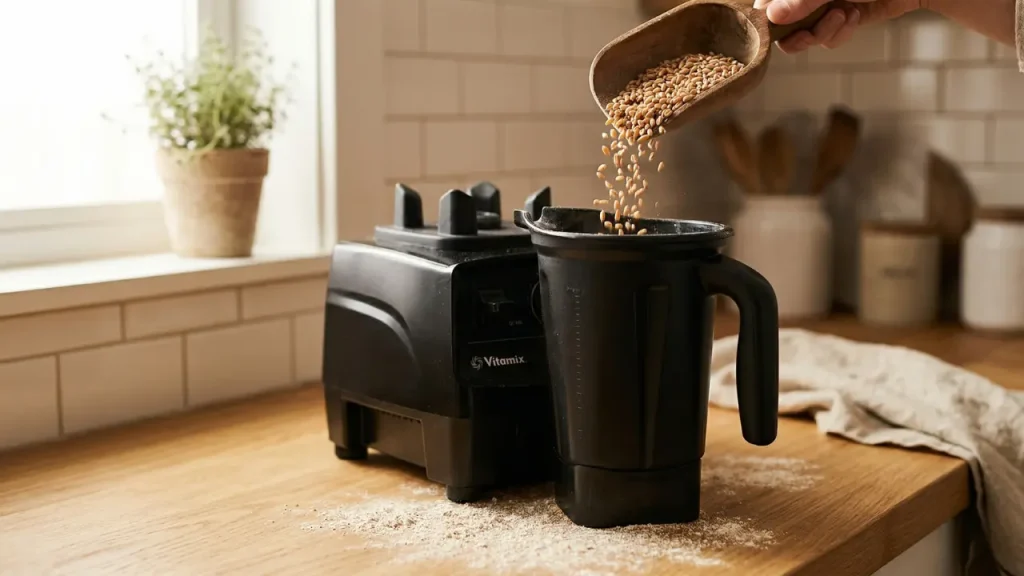
With a high-powered blender (Vitamix or Blendtec): This works really well! Blend in small batches about 1 cup at a time on high for 60 to 90 seconds. Sift the flour once and send any coarser pieces back through the blender. Blend the beans separately before mixing everything together.
With a regular food processor or coffee grinder: You can do it, but the flour will be coarser and your bread will be more rustic and crumbly. It will still taste great just a heartier texture.
You need about 4 to 4½ cups of sprouted grain flour for one 9×5 inch loaf.
Phase 3: Mixing and Baking the Dough
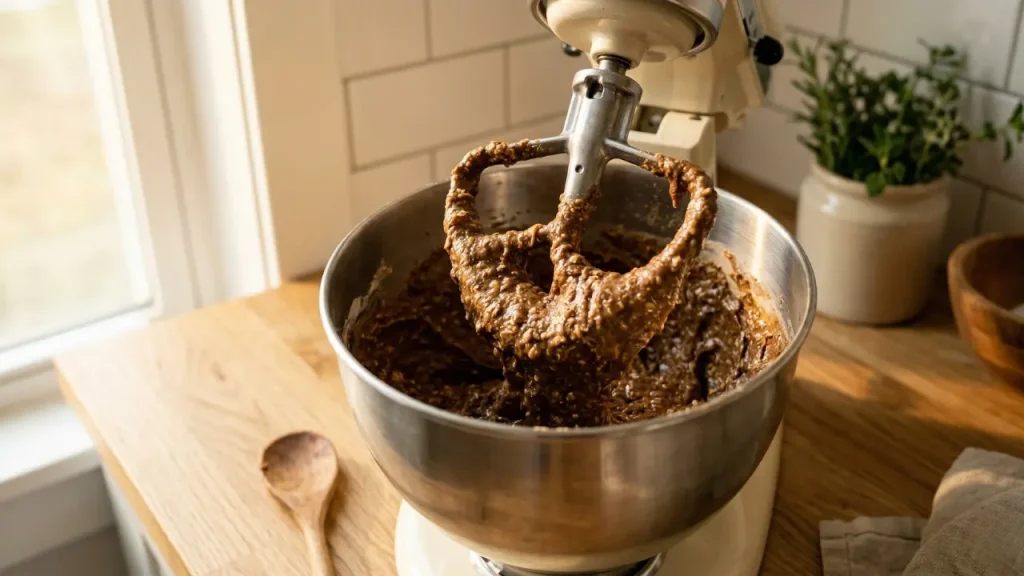
Here is the biggest surprise for first-time Ezekiel bread bakers: this is a batter bread, not a regular dough bread.
The mixture is much wetter and stickier than normal bread dough. You will not be kneading it on the counter or shaping it into a smooth ball. Instead, you mix a thick, sticky batter and pour it straight into the loaf pan. It is a very loose batter when you put it in the pan. It will not form a ball and that is okay! If your mixture looks like very thick muffin batter you are doing it perfectly. Trust the process!
What you need (makes one 9×5 inch loaf):
- 4 to 4½ cups freshly milled sprouted grain flour
- 2¼ tsp active dry yeast (that is 1 standard packet)
- 1½ cups warm water (105–110°F not too hot, not too cold!)
- 1 tbsp honey
- 1 tbsp olive oil
- 1¼ tsp sea salt
Step 1 — Wake up the yeast.
Pour the warm water and honey into a large bowl. Sprinkle the yeast on top. Stir gently and wait 5 to 10 minutes. You should see it get bubbly and foamy on top that foam means your yeast is alive and ready to work. If nothing happens after 10 minutes, the water was too hot (above 115°F kills yeast) or the yeast is old. Start this step over before adding any flour. Do not skip this check!
Step 2 — Mix the batter.
Add the sprouted grain flour, olive oil, and salt to your yeast mixture. Use a stand mixer with the paddle attachment (not the dough hook the dough hook does not work well with wet batter). Mix on medium speed for 2 to 3 minutes until everything comes together into a thick, sticky batter. If you are mixing by hand, use a strong wooden spoon and stir hard for 3 to 4 minutes. The batter will NOT look like normal bread dough. That is completely fine!
Step 3 — First rise.
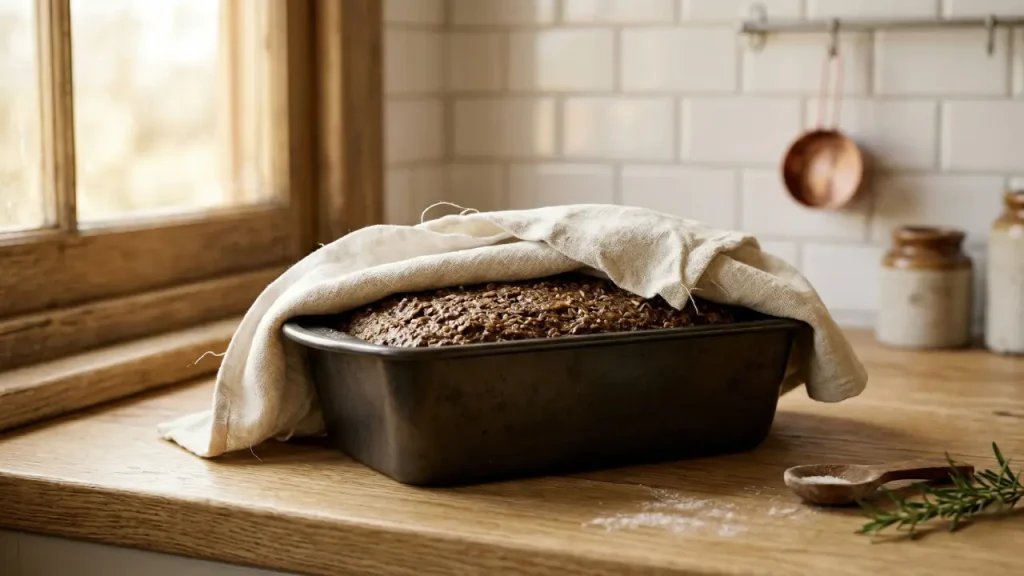
Grease a 9×5 inch loaf pan well with olive oil or cooking spray. Line it with a piece of parchment paper for easy removal later. Scoop the batter into the pan and smooth the top with a wet spatula. Cover the pan loosely with plastic wrap or a clean kitchen towel. Let it sit in a warm spot for 50 to 60 minutes until the batter rises to just above the top edge of the pan.
Helpful tip: If your kitchen is cold, the dough will rise slowly. Turn your oven on to 200°F for just two minutes, then turn it off. Put the covered pan inside the warm oven. Works like magic!
Step 4 — Bake.
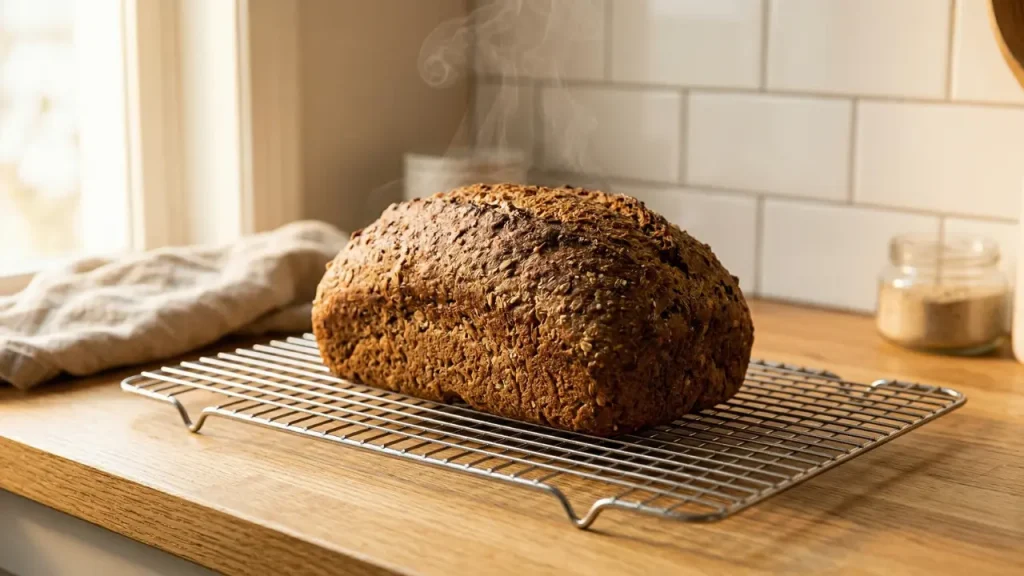
Preheat your oven to 375°F (190°C). Bake the loaf for 45 to 50 minutes until the top is deep golden brown. The best way to check if it is done is to use a kitchen thermometer the inside of the loaf should reach 200 to 205°F. If the top starts browning too quickly, tent it loosely with foil for the last 10 minutes.
Step 5 — WAIT before you cut it. (This is the hardest step!)
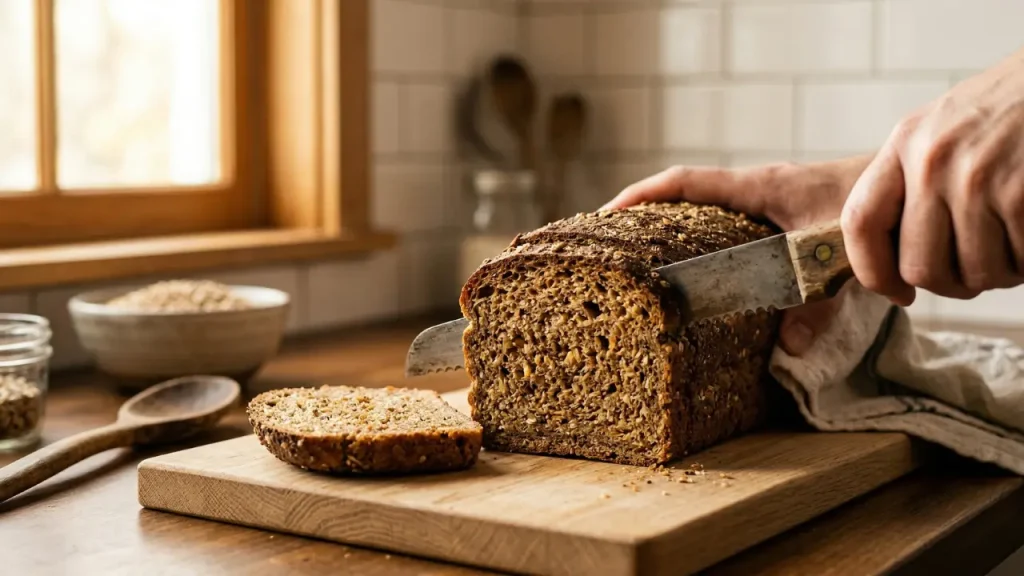
I know. The smell in your kitchen right now is incredible and waiting feels almost impossible. But please let the loaf cool in the pan for 10 minutes, then move it to a wire rack and wait at least 1 full hour before slicing. Cutting into warm bread can make the texture gummy. Allow it to cool fully so you get clean slices that toast perfectly. The bread needs that cooling time to fully set its crumb inside. You will be so glad you waited!
The “Shortcut” Method: Using Pre-Mixed Ezekiel Flour
No dehydrator? No grain mill? No problem at all!
You can still make a wonderful homemade Ezekiel-style loaf using store-bought sprouted grain flour. This skips Phase 1 and Phase 2 completely and takes the whole project from a few days down to about 2 hours.
Here are some good brands to look for:
- One Degree Organic Foods Sprouted Whole Wheat Flour — great quality and widely available
- To Your Health Sprouted Flour Co. — sells individual sprouted grain flours so you can mix your own blend
- Arrowhead Mills Sprouted Grain Flour — easier to find at regular grocery stores
Just jump straight to the mixing and baking steps above using your store-bought sprouted flour. The nutrition will not be quite as powerful as freshly sprouted and milled grains, but it is still enormously better than regular white or whole wheat bread and it is SO much easier.
One thing to watch: Store-bought sprouted flour soaks up water a little differently than fresh-milled flour. Add your water slowly and stop when your batter looks like thick muffin batter. Do not just dump it all in at once.
Expert Baking Tips for the Perfect Loaf
I have learned a lot from making this bread over and over again. Here are the tips that make the biggest difference:
1. Use a thermometer for your water. Your yeast water needs to be between 105°F and 110°F like warm bath water, not hot. Too cool and the yeast will not wake up. Too hot and you will kill it. A cheap kitchen thermometer takes 3 seconds to check and removes all the guesswork. It is worth having one!
2. Use the paddle attachment, not the dough hook. Because Ezekiel bread is a batter bread and so wet, the dough hook on your stand mixer just spins around without really mixing anything. The paddle attachment works the batter properly. If you only have a dough hook, mix by hand with a wooden spoon instead.
3. Do not slice warm bread. Ever. I already told you this above but it is worth saying again because it is the most common mistake! Dense, moist breads like this one need a full cool-down before the crumb sets properly. Slice too early and the inside will look gummy even if the outside is perfectly baked. One full hour minimum. Two hours is even better.
4. Freeze it right away. Homemade Ezekiel bread has zero preservatives, so it goes stale fast sometimes within 2 to 3 days at room temperature. The best thing to do is slice the whole loaf once it is cool, put a small piece of parchment between every few slices, and store them in a freezer bag. Toast slices straight from frozen they are fully thawed and warm in about 90 seconds and taste just-baked fresh!
5. Grease the pan well AND use parchment. Because the batter is so wet and sticky, it can glue itself to the pan. Grease the pan generously and then add a parchment paper sling on top. You will be able to lift the loaf out perfectly every time.
Nutritional Benefits of Sprouted Grain Bread
Let me talk about why health-conscious bakers have been making this bread for thousands of years because the nutrition story here is genuinely impressive.
- Complete Protein in Every Slice:- Most plant foods are missing at least one of the nine essential amino acids your body needs. Ezekiel bread solves this by combining grains (which are low in lysine) with legumes (which are packed with it). The result is a complete protein with all 9 essential amino acids entirely from plant sources. For anyone eating a plant-based diet, this is a really big deal.
- Your Body Actually Absorbs the Nutrients:- Sprouting breaks down phytic acid, which means the iron, zinc, magnesium, and B vitamins in these grains actually make it into your bloodstream. The sprouting process can increase the vitamin content of some whole grains and decrease the amount of phytic acid, making certain minerals much easier to absorb.
- Keeps Your Blood Sugar Steady:- Ezekiel bread has a glycemic index score of 36, which makes it a low-GI food. This low score comes from the sprouted grains and legumes, whose fiber and protein cause a slower, gentler release of sugar into the bloodstream. For comparison, white bread has a glycemic index of around 70 to 75. That is nearly double!
- High Protein and Fiber:- Each slice of Ezekiel bread contains about 5 grams of protein which is pretty good for a piece of bread and about 3 grams of fiber. That keeps you feeling full longer and helps your digestive system run smoothly.
- No junk.:- No refined flour, no added sugar, no artificial preservatives. Just real whole food exactly the way that ancient recipe intended.
Frequently Asked Questions
Q1. Is Ezekiel Bread Gluten-Free?
No, Ezekiel bread is not gluten-free. Four of the six main ingredients wheat, spelt, barley, and sometimes rye all contain gluten.
Q2. Why Do You Have to Keep Ezekiel Bread in the Freezer?
Because homemade Ezekiel bread has no preservatives zero, none it goes stale and sometimes moldy very quickly at room temperature, often within just 2 to 3 days. The freezer keeps it fresh for up to 3 months.
Q3. Does Ezekiel Bread Taste Good?
Yes, but it is a different kind of good than soft white sandwich bread. Ezekiel bread is dense, hearty, and chewy. It has a nutty, earthy flavor from all those sprouted grains. It tastes real in a way that is hard to explain until you try it.
Made this recipe? I want to hear all about it! Leave a comment below and tell me did you go the full traditional sprouting route, or did you use the shortcut method? And what did you put on your first slice? 😊